How to Use OBS Studio: A Comprehensive Guide for 2024
OBS Studio has become an essential tool for content creators in 2024, offering a powerful and versatile platform for live streaming, recording, and broadcasting. This comprehensive guide aims to help both beginners and experienced users navigate OBS Studio’s complex features and settings. From setting up your first scene to leveraging advanced features and troubleshooting common issues, we’ll cover everything you need to know to use OBS Studio effectively.
Key Takeaways
- OBS Studio is a robust platform suitable for a variety of content creation needs, including live streaming, gameplay recording, and professional broadcasts.
- The software requires some time investment to learn, but it offers a user-friendly interface and a wealth of online tutorials and resources for assistance.
- Users can optimize their streaming and recording settings within OBS Studio to balance performance and quality, tailoring the experience to their system’s capabilities.
- Advanced features such as custom transitions, plugins, and interactive elements allow for a highly personalized and engaging viewer experience.
- Regular updates and a strong community support system ensure that users can stay up-to-date with the latest features and find help when troubleshooting issues.
Getting Started with OBS Studio

Understanding the Interface
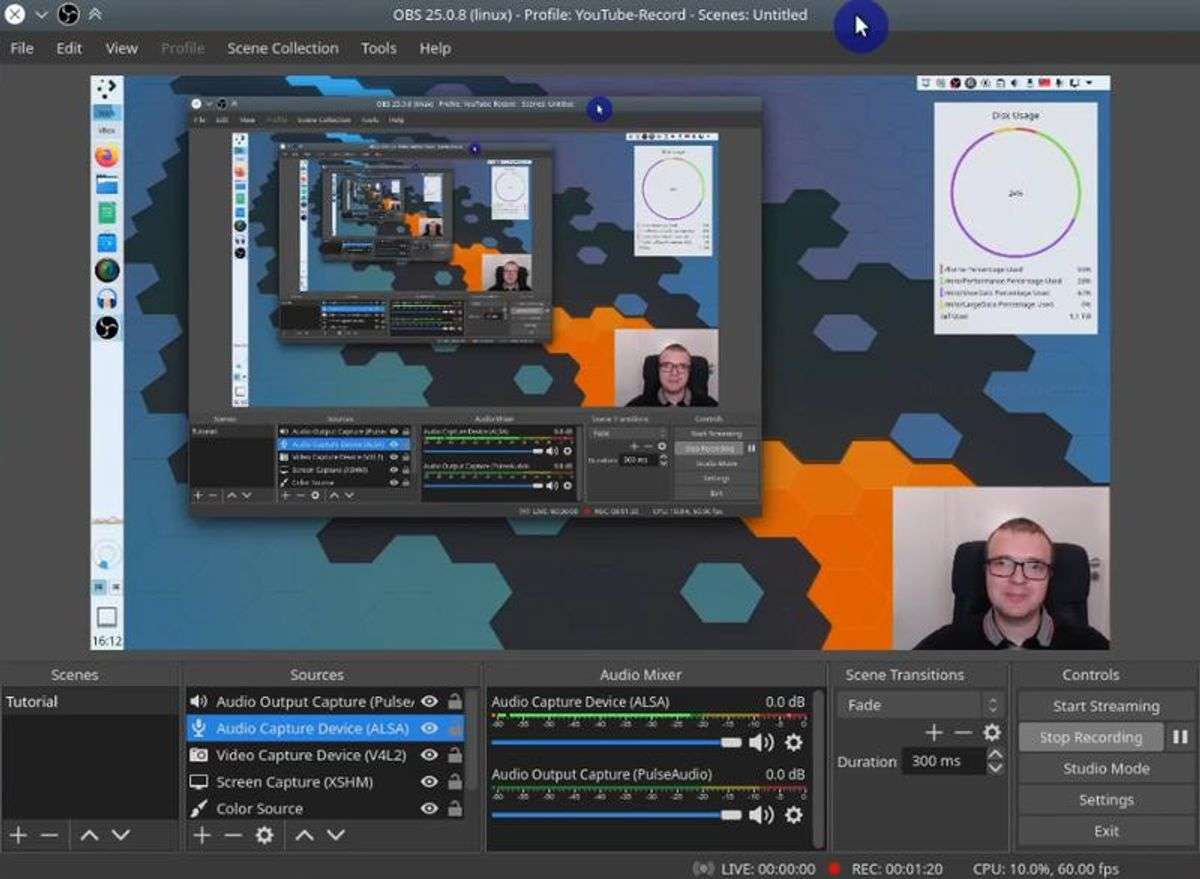
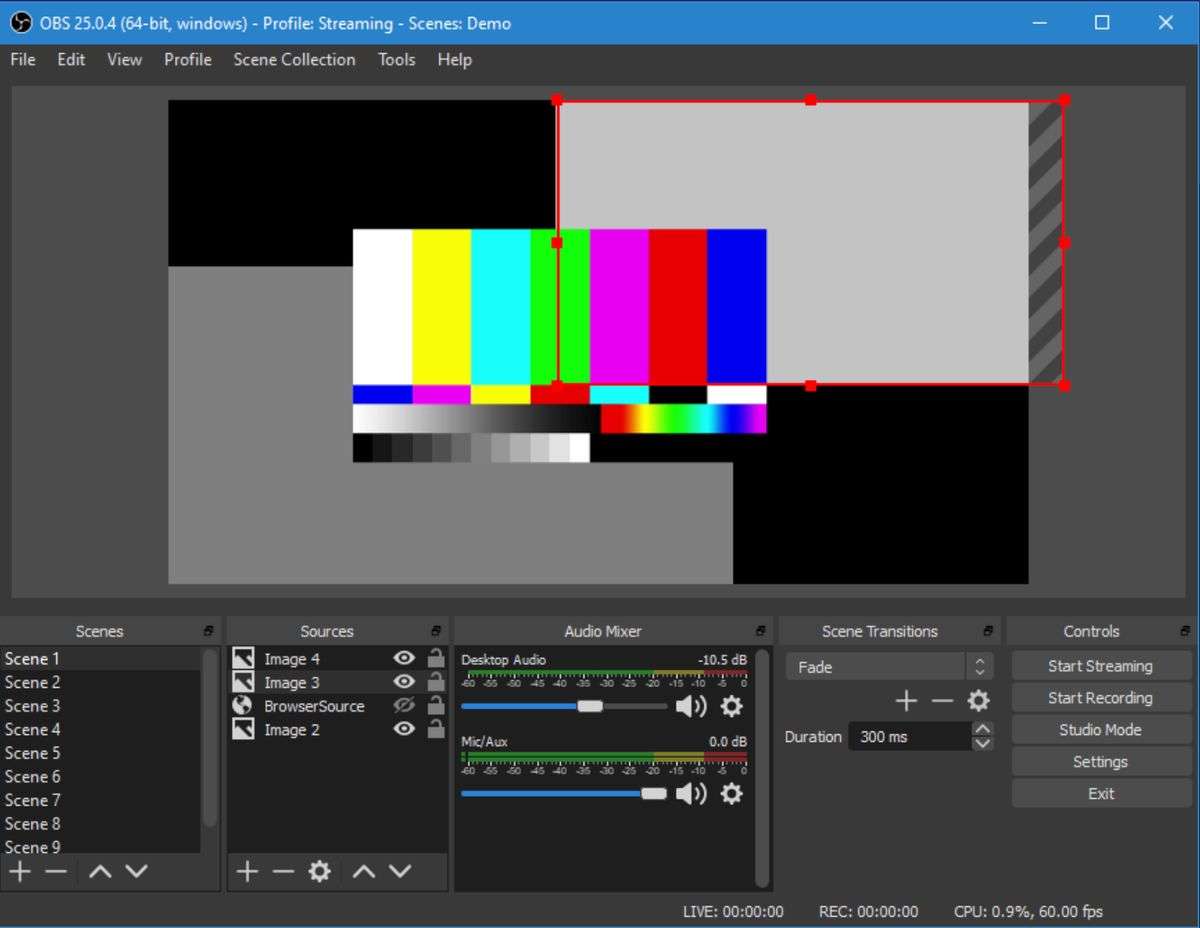
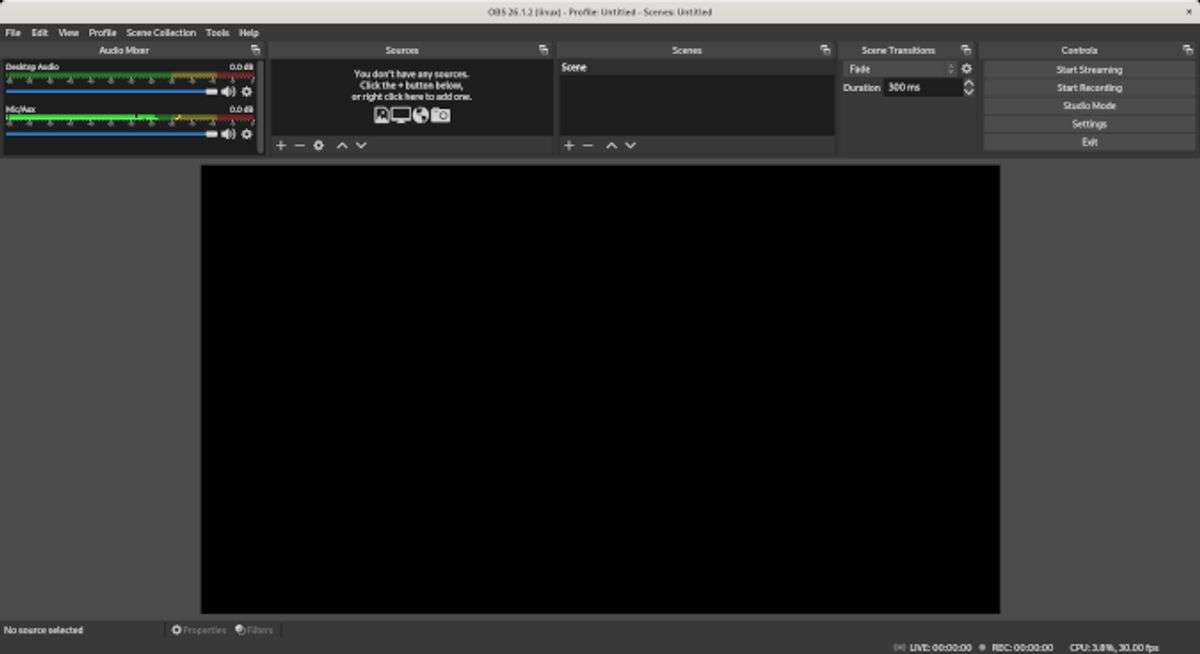
Dive into the heart of OBS Studio with confidence. The interface might seem daunting at first, but it’s designed with intuitiveness in mind. Your creativity is the limit as you navigate through the various panels and settings.
Start by familiarizing yourself with the main areas:
- Scenes: Your production’s building blocks.
- Sources: Where you add cameras, images, and more.
- Audio Mixer: Control and balance your sound.
- Scene Transitions: Add flair between scene switches.
- Controls: The command center for streaming and recording.
Each section is a gateway to customization. Play around, click buttons, and see what happens. Remember, there’s an undo button for a reason!
System Requirements and Compatibility
Before you dive into the world of streaming with OBS Studio, let’s make sure your gear is up to snuff. Your choice of operating system is a matter of taste, but keep in mind, Mac users might need an extra hub for those USB connections.
When it comes to graphics cards, think memory, power, and bandwidth. Here’s a quick checklist for your setup:
- OS: Windows, macOS, or Linux – pick your fighter!
- Graphics: A card that can handle your stream’s dazzle.
- Dual-Computer Setup: Not a must, but it can supercharge your stream.
Remember, different online video platforms (OVPs) have unique encoder settings. Choose an OVP that aligns with your desired output and system capabilities. And hey, if you’re tweaking video settings, balance is key. Aim for high quality without bogging down your or your viewers’ experience.
Downloading and Installing OBS Studio
Ready to get OBS Studio up and running? Start by heading to the official OBS Studio website. It’s your one-stop-shop for a safe and secure download, tailored for your operating system—be it Windows, macOS, or Linux.
Here’s how to nail the installation:
- Navigate to the Download section on the OBS website.
- Select the version that matches your OS.
- Locate the downloaded installer file on your computer.
- Run the installer and follow the on-screen prompts.
Remember, always download OBS from the official source to avoid any shady business. Once installed, fire it up and dive into the world of streaming and recording!
Configuring Your First Scene
Adding Sources and Layers
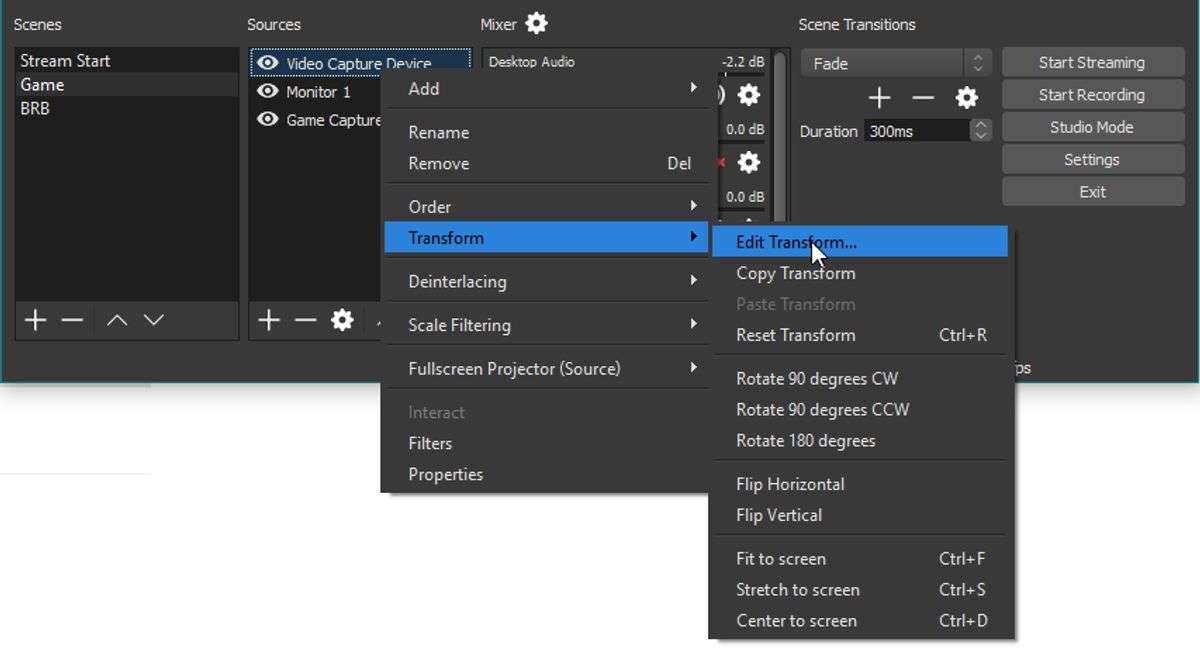
Think of your scene as a canvas, and sources are the paints you’ll use to create your masterpiece. Launch OBS and dive into the ‘Sources’ box to start adding the elements that will appear in your stream. Right-click, select ‘Add’, and choose from a plethora of options like ‘Video Capture Device’ or ‘Display Capture’.
Each source you add can be a layer in your scene. Arrange them by dragging and dropping to stack them just right. Remember, the order matters! The top layer in the list covers those below it. Here’s how to get started:
- Click the ‘+’ button in the ‘Sources’ widget.
- Select your source type: display capture, webcam, image, etc.
- Give your source a name that reflects its role.
- Adjust the properties to fit your scene perfectly.
Mix and match sources to finalize your content. Add a browser source for interactive elements or a media source for pre-recorded videos. The possibilities are endless, so experiment to find what works best for your stream!
Using Custom Transitions
Elevate your stream’s aesthetics with custom transitions. Ditch the mundane cuts; instead, use Stinger transitions for a seamless and stylish switch between scenes. Here’s how to get started:
- Click the “+” under “Scene Transitions” in OBS Studio.
- Select “Stinger” from the list. Can’t find it? Head to the “Docks” menu and activate the necessary dock.
OWN3D Pro offers a vast selection of Stinger Transitions to transform your content. With just a few clicks, you can add a professional flair to your streams. Remember, the right transition can keep your audience engaged through every scene shift.
Scene Collections Explained
Think of Scene Collections as your streaming wardrobe. Each collection is a unique set of scenes, ready to dress up your stream for any occasion. Switching between collections is like changing outfits, ensuring you’re always on point for your audience.
To import a Scene Collection from OWN3D Pro into OBS Studio, follow these simple steps:
- Create a folder with scenes in your OWN3D Pro Dashboard.
- Click on “Get OBS File” to download the .json file.
- Open OBS Studio, go to “Scene Collection”, and select “Import”.
- Choose the .json file you saved and click “Import”.
- Select your new imported Scene Collection and you’re set!
Now, your stream has a fresh look with minimal effort. Remember, a well-organized Scene Collection can be the difference between a good stream and a great one. Keep your collections tidy, and your transitions will be as smooth as your gameplay.
Audio and Video Settings Mastery
Optimizing Video Quality
Craving crystal-clear streams? Tweak your OBS settings for that professional sheen. Start with the Video and Audio tabs—this is where the magic happens. Adjust the video bitrate to suit your content’s needs; higher bitrates mean higher quality, but don’t forget your audience’s bandwidth.
Here’s a quick guide to bitrates for various resolutions:
- ULD (Ultra-Low Definition): 350 Kbps
- LD (Low Definition): 350-800 Kbps
- SD (Standard Definition): 800-1200 Kbps
- HD (High Definition): 1200-1900 Kbps
- FHD (Full High Definition): 1900-4500 Kbps
Remember, resolution isn’t everything. The right downscale filter and FPS can make or break your video’s smoothness. Lanczos or Bicubic are your go-to filters, and while 30fps works for most, 60fps will give that extra fluidity if your bandwidth allows.
Lastly, don’t overlook your encoder. A robust CPU can handle x264, but if you’re GPU-rich, NVENC or AMD VCE might be your best bet. Match your bitrate to your upload speed and platform guidelines—3000-6000 kbps for 720p at 30fps, or 4500-8000 kbps for 1080p at 60fps. And keep that keyframe interval at a steady 2 seconds for optimal streaming.
Balancing Audio Inputs
Getting your audio mix just right in OBS Studio can make or break your stream’s quality. Balance is key. Each audio source should complement, not compete. Start by adding an Audio Input Capture to your scene for each device: your mic, your music, your game.
Adjust each source’s volume in the Audio Mixer. Aim for clarity and harmony. Remember, your voice should be front and center. Use the gear cog symbol to access advanced properties and tweak to perfection. Here’s a quick guide to setting up your audio interface on Windows:
- Navigate to the Audio Mixer.
- Click on Mic/Aux.
- Hit the Settings button (small gear cog symbol).
- Select Properties.
Split your audio tracks for flexibility. Isolate voices for promos or highlight key quotes. It’s not just about the live mix; it’s about future-proofing your content. Record separate tracks by ticking boxes in the advanced output settings. Simple, yet powerful.
Syncing Audio and Video
Ever noticed your voice isn’t quite in step with your video? Sync issues can throw off your entire stream. But don’t worry, fixing audio and video sync in OBS is straightforward. Start by opening OBS Studio and checking the sound mixer. Pinpoint the audio source that’s lagging behind.
Next, adjust the audio delay settings. Here’s a quick guide:
- Find the ‘Advanced Audio Properties’ by right-clicking the audio source.
- Enter a delay value (in milliseconds) to sync the audio with the video.
- Test and tweak until it’s just right.
Remember, every setup is unique. Your perfect sync settings might differ from the standard. If you’re streaming to platforms like Dacast, check their specific OBS settings for optimal performance. Keep an eye on your encoder’s output quality, and don’t be afraid to fine-tune your audio mixer settings for the best results. With a bit of patience, you’ll have your audio and video marching in lockstep, ensuring a seamless experience for your viewers.
Streamlining Your Streaming Setup
Connecting to Streaming Platforms
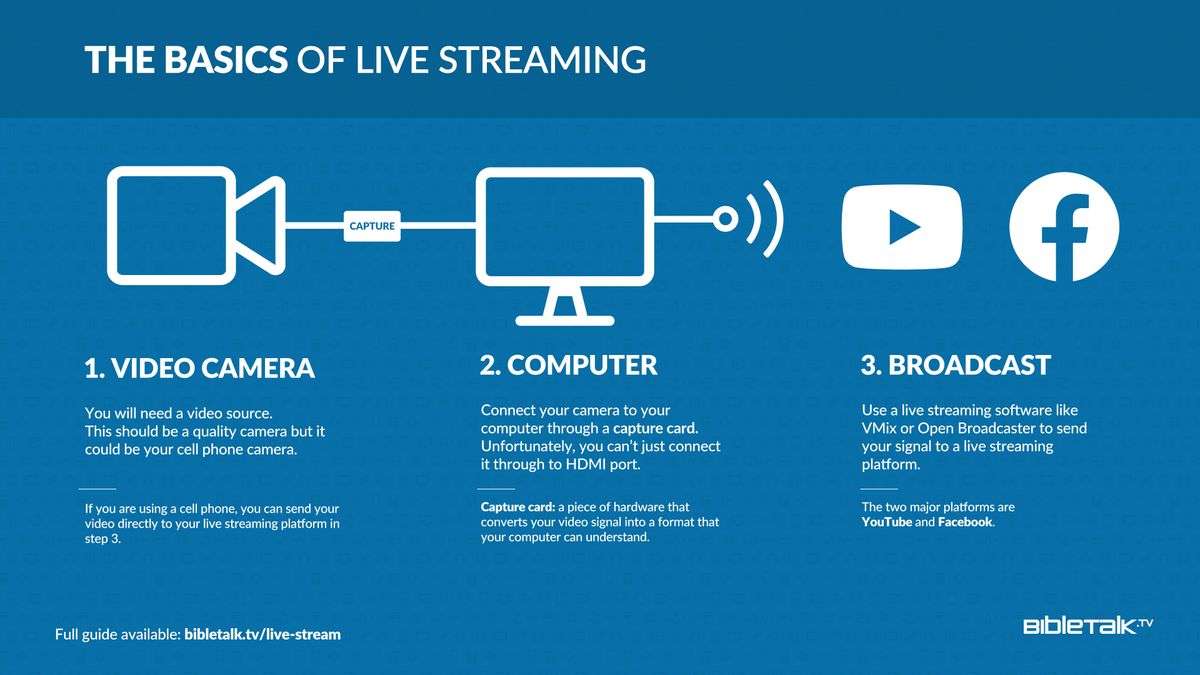
Ready to go live? Connecting your OBS Studio to streaming platforms is a breeze. First, choose your platform – Twitch, YouTube, Facebook, or maybe all of them? Each platform has its own stream key. Securely input this into OBS to establish a link.
Here’s a quick rundown:
- Twitch: Find your stream key in the ‘Channel and Videos’ section of your dashboard.
- YouTube: Go to the ‘Live Streaming’ tab on your Creator Studio.
- Facebook: Look under ‘Live Producer’ for your stream key.
Remember, never share your stream key! It’s the secret sauce that connects OBS to your audience. Once you’re set up, hit ‘Start Streaming’ and you’re live to the world. It’s showtime!
Stream Keys and Privacy Settings
Your stream key is the secret sauce to going live. Keep it confidential to prevent unauthorized streaming under your name. On platforms like Dacast, you’ll copy your ‘Stream Name’ and ‘Server’ from the ‘Encoder Setup’ into OBS. Simple, right?
Privacy is paramount. Review app permissions carefully, granting OBS only what’s necessary. Remember, you’re in control of your camera, mic, and accessibility settings.
Here’s a quick checklist for your streaming setup:
- Ensure your stream key is securely stored.
- Double-check app permissions for essential access only.
- Set your ‘Output Mode’ to ‘Advanced’ for greater control.
- Consider recording your live stream locally as a backup.
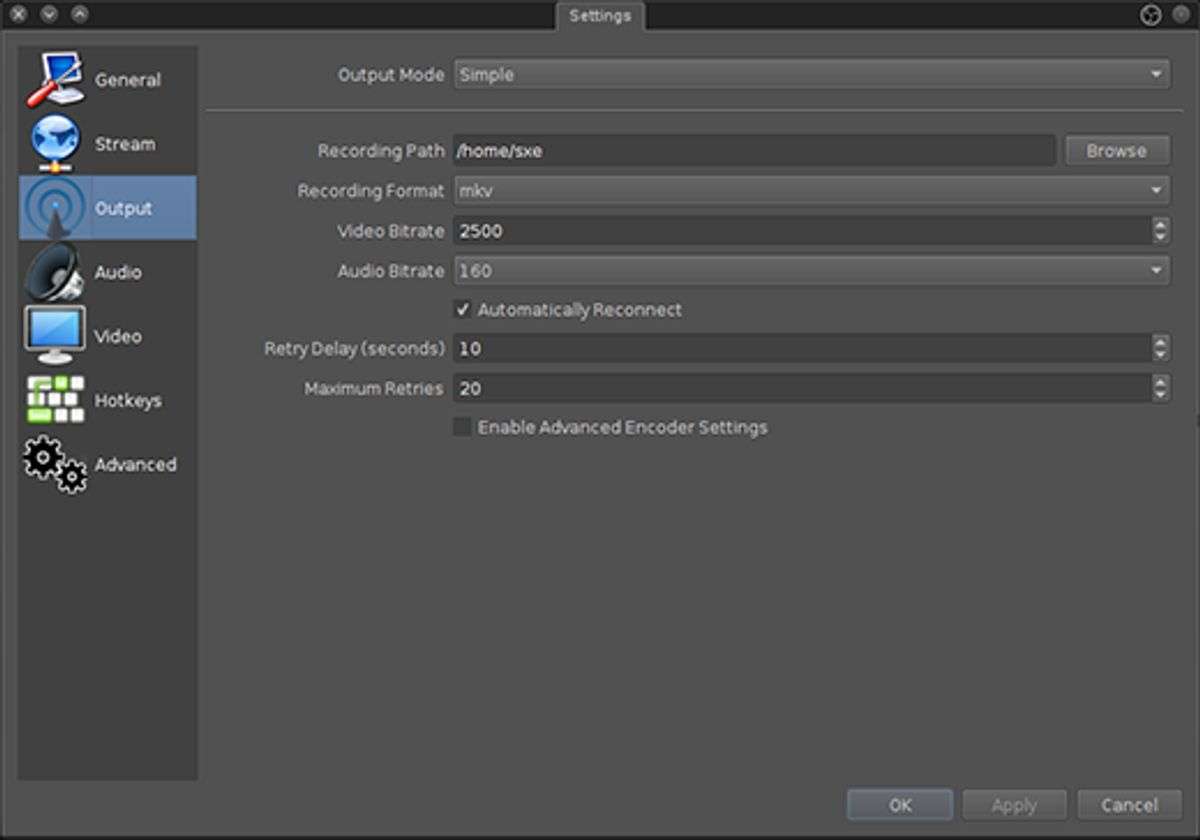
By managing these settings, you’re safeguarding your content and your viewers’ experience. Dive into the ‘Output’ tab for detailed tweaks like bitrate and recording paths. Your stream, your rules!
Creating a Consistent Streaming Schedule
Consistency is your secret weapon. Stick to a schedule to build a loyal audience that knows exactly when to tune in. Random streaming times? A big no-no. Your viewers crave predictability, and a fixed schedule is like a promise you make to them.
Peak times are your best friend. Identify when your audience is most active and stream at peak times to maximize engagement. It’s not just about being live; it’s about being live when it matters most.
Remember, quality trumps quantity. Don’t skimp on equipment. High-quality audio and video are non-negotiables if you want viewers to stick around. And if you’re eyeing that multi-platform presence, crisp streams are essential for repurposing content later.
- Set a clear streaming schedule
- Identify and utilize peak streaming times
- Invest in quality streaming equipment
By following these steps, you’ll not only retain viewers but also attract new ones. They’ll come for the consistency and stay for the quality. Check out our guide on the best OBS Studio settings for broadcasting live streams to get started.
Recording Like a Pro with OBS Studio
Setting Up for High-Quality Recording
Craving that crisp, clean recording quality? Your journey starts in the settings. Dive into the ‘Output’ tab and fine-tune your bitrate. A higher bitrate equals better quality, but don’t overdo it—balance is key. Remember, bitrate is crucial for clarity but can be a bandwidth hog.
Next up, frame rate and resolution. These are your visual fidelity MVPs. Aim for the sweet spot where smooth motion meets sharp detail. Here’s a quick cheat sheet:
- Resolution: 1080p for full HD, 4K for ultra detail.
- Frame Rate: 30 fps for standard, 60 fps for ultra-smooth action.
Don’t forget audio—your voice needs to shine! Adjust levels in the ‘Audio Mixer Box’ for that studio-quality sound. And for a touch of flair, sprinkle in some scene transitions. They’re not just eye candy; they make your content flow.
These tweaks are your ticket to a top-tier recording. Check out our detailed guide, ‘Best OBS Setting for Recording in 2024‘, for a step-by-step walkthrough with visuals. And always, keep an eye on performance. A high-quality video is great, but not at the cost of a smooth viewing experience.
File Formats and Saving Options
Choosing the right file format is crucial for your recordings. MP4 is your go-to format, widely accepted and easy to work with in post-production. But don’t overlook other formats like MKV, which offers resilience against file corruption.
When it comes to saving your masterpieces, it’s all about location, location, location. Navigate to ‘Settings’ and hit the ‘Output’ tab. Here’s where you set your Recording Path. Click ‘Browse’ to pick a spot where your files will feel at home.
Remember, the best OBS recording settings hinge on your needs. Whether it’s space-saving efficiency or the highest quality, tailor your settings to fit your project. And always hit ‘OK’ to save the changes!
Tips for Post-Recording Editing
Editing is where the magic happens. Take control of your audio by splitting tracks; this lets you fix glitches or overlap without affecting the entire recording. Remember, precision is key. Use the Preview Window to ensure your video looks top-notch before finalizing.
Here’s a quick checklist for post-recording editing:
- Review your recording in the Preview Window.
- Adjust audio levels in the Audio Mixer Box for clarity.
- Apply dynamic Scene Transitions for a professional touch.
- Utilize the Controls to tweak recording settings effortlessly.
With these tips, you’ll elevate your content from good to great. Happy editing!
Leveraging Advanced Features
Exploring Plugins and Extensions
Unlock the full potential of OBS Studio with plugins and extensions. Dive into a world of customization that can elevate your streams to the next level. From chat integration to advanced analytics, there’s a plugin for almost every need.
Don’t know where to start? Here’s a quick list of must-try plugins:
- Streamlabs: For donations, alerts, and overlays.
- Twitch Integration: Engage with your viewers directly.
- Advanced Scene Switcher: Automate your transitions.
Remember, the right plugins can transform your streaming experience. But beware of overloading—too many can slow you down. Keep it sleek, keep it powerful.
Multi-View and Studio Mode
Dive into the heart of professional streaming with OBS Studio’s Multi-View and Studio Mode. Switch scenes like a TV director, managing multiple sources without breaking a sweat. Here’s how to get started:
- Open OBS Studio and click on the ‘View’ menu.
- Select ‘Multi-View’ to see all your scenes at once.
- Toggle ‘Studio Mode’ to preview scenes before going live.
Studio Mode is your backstage pass, giving you control over transitions and fine-tuning before your audience sees the changes. It’s perfect for ensuring a smooth, professional broadcast. Remember, practice makes perfect. Spend time getting familiar with these features to elevate your production quality!
Interactive Elements and Overlays
Elevate your stream’s visual appeal with interactive elements and overlays. Engage your audience like never before by adding dynamic features that react to their interactions. From ‘Just Chatting’ to ‘Game Overlays’, the possibilities are endless.
Here’s a quick list of overlays to consider:
- Just Chatting Overlays
- Game Specific Overlays (e.g., Call of Duty, Fortnite)
- Alert Notifications (Twitch, YouTube, Facebook)
- Intermission Banners and Talking Screens
Don’t forget to explore event-themed overlays for that seasonal touch, like Christmas or Halloween. With tools like the OWN3D Pro Scene Builder, customizing your stream’s look is a breeze. Dive into the world of overlays and find the perfect match for your channel’s vibe. Remember, a well-designed overlay can make your stream stand out in a sea of content creators.
Troubleshooting Common OBS Studio Issues
Dealing with Lag and Performance Problems
Lag can be the bane of your streaming experience, but fear not! Tweaking your output settings is key to a smooth performance. Start by adjusting your resolution, bitrate, and frame rate. These aren’t just fancy terms; they’re the backbone of your stream’s quality. Remember, higher isn’t always better.
Find a balance that works for your audience’s systems and internet speeds. For instance, a 1080p resolution at 60fps might look crisp, but can your viewers handle it without buffering? Sometimes, opting for 720p with a stable frame rate is the smarter choice. Here’s a quick guide to get you started:
- Base (Canvas) Resolution: Your monitor’s native resolution, typically 1920×1080.
- Output (Scaled) Resolution: Tailor this to your platform and audience, like 1280×720 (720p) or 1920×1080 (1080p).
- Downscale Filter: Lanczos or Bicubic for sharper images.
- FPS: 30fps is often enough, but go for 60fps if you want smoother motion.
Don’t let OBS lagging while recording be your downfall. Strike the right settings and keep your stream as fluid as your content!
Audio-Video Sync Issues
Out of sync audio and video can ruin your stream’s professionalism. Nail the sync, or your viewers might bounce. Start by checking your sample rate; it should match across devices. Use 48kHz for a smooth experience.
Follow these steps to keep your audio and video in harmony:
- Open OBS’s ‘Advanced Audio Properties’.
- Adjust the ‘Sync Offset’ for individual audio sources.
- Test and tweak during a recording—not live!
- If issues persist, explore FFMPEG video filters for advanced syncing.
Remember, consistent settings are key. Here’s a quick reference:
- Video Codec: H.264
- Frame Rate: 25 or 30 FPS
- Keyframe Interval: 3 secs
- Audio Codec: AAC
- Audio Bitrate: 128 Kbps
- Audio Channels: 2 (Stereo)
Sync issues can be complex, but with patience and the right settings, you’ll keep your audience engaged and your content sharp.
Resolving Compatibility and Update Errors
Hit a snag with an update or compatibility? Don’t panic. First, ensure OBS is fully up-to-date. Outdated versions often lead to headaches. If you’re facing the dreaded ‘OBS not responding‘ message, it’s time to dig deeper. Check the forums; sometimes, the culprit is an unnecessary plugin.
To safeguard your setup, back up your profile and scene collections. Use the provided uninstaller for troublesome plugins, and don’t forget to clean out %appdata% as well.
Remember, compatibility issues can also stem from your operating system. If you’ve recently upgraded your OS, verify that OBS supports the new version. Still stuck? Reach out to the OBS community. They’re an invaluable resource for troubleshooting these pesky problems.
Enhancing Your Content with OBS Studio
Incorporating Graphics and Branding
Your stream’s look is your brand’s handshake. Make it memorable. Start by adding custom graphics that resonate with your audience. Use OBS Studio to overlay logos, banners, and alerts that reflect your unique style.
Keep it consistent across all scenes. Here’s a quick checklist:
- Design a cohesive color scheme
- Choose fonts that embody your brand
- Create overlays for different stream segments
- Update graphics regularly to keep things fresh
Remember, your visual identity sets the tone. It’s more than just aesthetics; it’s about making a connection. So, dive into OBS Studio’s rich features and let your brand’s personality shine through every pixel.
Utilizing Green Screen Technology
Dive into the magic of green screen technology with OBS Studio and transform your streaming space into any world you can imagine. Set the stage for limitless creativity by mastering this tool. Here’s how to get started:
- Choose a high-quality green screen that’s wrinkle-free and evenly lit.
- In OBS, add your green screen footage as a new source under the ‘Video Capture Device’.
- Apply a Chroma Key filter to remove the green, revealing the transparent background.
- Experiment with different backgrounds, ensuring they complement your content and brand.
Remember, lighting is key. Poor lighting can lead to shadows and uneven keying, which can ruin the illusion. With a bit of practice, you’ll be presenting like a television weather caster, with changeable backgrounds that captivate your audience.
Engaging Viewers with Interactive Content
Want to keep your viewers glued to the screen? Interaction is key. Use the live chat to create a two-way conversation. It’s not just about broadcasting; it’s about engaging. Ask questions, run polls, and make shout-outs. Your audience will love the personal touch.
Here’s how to ramp up the interaction:
- Q&A sessions: Spark curiosity and provide value. Answering questions in real-time shows you care.
- Polls and surveys: Let viewers have a say. It’s a fun way to involve them and gather feedback.
- Contests and giveaways: Everyone loves free stuff. Use these to incentivize participation and reward loyal viewers.
Remember, the more you interact, the more you build a community around your content. And don’t forget to check out events like ‘Create Videos With OBS Studio‘ on Eventbrite for more tips on crafting engaging videos.
OBS Studio for Different Content Creators
Best Practices for Gamers
As a gamer, your choice of game can make or break your stream. Choose titles that resonate with you but don’t ignore the trends. It’s a balance between authenticity and what’s hot. Remember, your passion for the game is infectious.
Don’t skimp on equipment. Good hardware means a smoother stream and happier viewers. Whether you’re on PC, console, or mobile, invest in quality. Here’s a quick checklist:
- Game Capture: Precision is key for gaming streams.
- Browser: For streaming browser-based games or content.
- Display Capture: When you want to share it all.
Multistreaming can catapult your reach. Platforms like Twitch and YouTube are your stages—learn the ins and outs. And always, always engage with your audience. Your chat is your community; nurture it.
Setting Up for Podcasts and Interviews
Podcasting is all about clarity and engagement. Invest in a quality microphone like the Blue Yeti to ensure your voice is crystal clear. Remember, your audio is your audience’s lifeline to you.
When it comes to interviews, separate audio tracks are a game-changer. They allow for precise editing and balancing of each speaker’s levels. Use tools like Riverside.fm to record with guests from anywhere, turning your best ideas into captivating conversations.
Here’s a quick checklist for your setup:
- High-quality microphone
- Headphones to avoid audio feedback
- Reliable recording software (consider Riverside.fm for remote interviews)
- A quiet, echo-free room
Lastly, keep your content fresh and your schedule consistent. Use a podcast planning template to stay organized and ahead of the game.
Creating Educational and Tutorial Videos
Elevate your educational content with OBS Studio. Craft tutorials that captivate by leveraging the software’s robust features. Start by outlining your lesson plan. Break down complex topics into digestible segments, ensuring each part is clear and concise.
Next, set up your scene. Use multiple sources to present various types of content. A webcam for face-to-face interaction, screen capture for demonstrations, and text overlays for key points. Remember, clarity is king in educational videos.
Finally, engage with your audience. Use OBS Studio’s interactive elements to create quizzes or live Q&A sessions. Here’s a quick checklist to ensure you’re on track:
- Outline your lesson plan
- Set up diverse sources (webcam, screen capture, etc.)
- Add interactive elements (polls, quizzes)
With these steps, you’ll produce content that not only informs but also keeps viewers coming back for more. Dive into the world of educational streaming with confidence and watch your audience grow!
Staying Updated and Learning More
Keeping OBS Studio Up-to-Date
Staying current with OBS Studio is crucial for a seamless streaming experience. Always download updates directly from the official OBS website to avoid security risks. New releases often include bug fixes, new features, and compatibility improvements.
To check for updates, simply open OBS Studio and navigate to the ‘Help’ menu, then select ‘Check for Updates’. If an update is available, follow the on-screen instructions to download and install. Remember, keeping your software up-to-date ensures you’re using the most stable and secure version available.
Here’s a quick rundown of the latest version:
- Version: OBS Studio 30.0.2
- Release Date: December 11th, 2023
- Compatibility: macOS 11+, Windows 10/11, Ubuntu 20.04+
Note: For Linux users, ensure you have FFmpeg installed. By staying updated, you not only protect your system but also gain access to the latest tools and enhancements for your content creation journey.
Finding Resources and Community Support
Don’t go it alone! Tap into the wealth of knowledge from the OBS community. Forums are your go-to for real-world advice; find threads brimming with insights and solutions. Check out the OBS Forums for posts like, “Hi Everyone, I am pretty new to the streaming community and wanted to stream some trading lessons on YouTube…” where you can connect with peers and experts alike.
Dive into the Learning Center for a deep-dive into OBS features, or hit up the Support Articles for quick fixes. Here’s a quick list to get you started:
- Learning Center: Blog posts, case studies, and the latest feature updates.
- Support: 24/7 help, phone support, and professional services.
- Support Articles: Knowledge base and FAQs to troubleshoot on the fly.
Remember, the right resources can elevate your streaming game. Stay curious, stay connected!
Continuing Education with Tutorials and Guides
Don’t let your OBS skills stagnate. The world of streaming is always evolving, and so should you. Keep your edge sharp with the latest tutorials and guides. Dive into resources like blogs, webinars, and case studies to stay on top of new features and best practices.
Follow these steps to ensure you’re always learning:
- Bookmark the OBS Learning Center.
- Subscribe to top streaming blogs.
- Attend webinars and panel discussions.
- Review case studies to learn from the pros.
- Experiment with new OBS features as they roll out.
Remember, the key to mastery is constant practice and staying informed. Your audience will notice the difference!
Conclusion
As we wrap up this comprehensive guide to OBS Studio for 2024, it’s clear that whether you’re a seasoned content creator or just starting out, OBS Studio remains an indispensable tool in your digital arsenal. With its robust features, from multi-source mixing to advanced audio/video filters, OBS Studio caters to a wide range of broadcasting needs. The learning curve might seem daunting at first, but with patience and practice, the payoff in video and streaming quality is undeniable. Remember, the key to mastering OBS Studio is to dive in, experiment with settings, and utilize the plethora of tutorials available. So go ahead, download OBS, tweak those settings, and start creating content that stands out! Happy streaming!
Frequently Asked Questions
What does OBS stand for in streaming?
OBS stands for Open Broadcaster Software. It’s a popular tool for video recording and live streaming, offering high-quality video production capabilities to content creators of all experience levels.
Is OBS Studio easy to use for beginners?
While OBS Studio has a straightforward interface and a wealth of tutorials and resources, it also has a steep learning curve due to its extensive range of options and settings, which may be overwhelming for new users.
Where can I find OBS Studio tutorials?
Tutorials for OBS Studio can be found on various online platforms, including YouTube, forums, and the official OBS website. These resources cover everything from basic setup to advanced features.
Can OBS Studio be used for more than just live streaming?
Yes, OBS Studio is versatile and can be used for live streaming, multi-platform screen recording, casting, and creating high-quality gameplay videos, podcasts, and tutorials.
What are the system requirements for OBS Studio?
OBS Studio has specific system requirements to ensure optimal broadcasting performance. These include a compatible operating system, a suitable processor and graphics card, and enough memory and storage.
How do I set up OBS Studio for the first time?
Setting up OBS Studio involves familiarizing yourself with its interface and modifying settings to suit your recording or streaming needs. Guidance is available through online tutorials and the software’s help documentation.
What are OBS Studio import files?
OBS Studio import files typically refer to scene collections, profiles, or configuration files that can be imported into OBS to quickly set up the software with predefined settings.
What features does OBS Studio offer for new broadcasters?
OBS Studio provides features like mixing multiple sources with custom transitions, using audio/video filters and correction tools, and a range of other settings to enhance the live broadcasting experience for new users.


